Greetings!
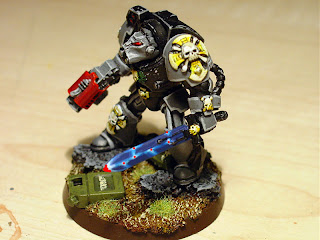
In this tutorial, I'll show you how to make relatively simple power weapon effects.
Paints you'll need:
GW Regal Blue
GW Enchanted Blue
GW Ice Blue
GW Skull White (optional)
so let's begin.......
1. Pain the whole weapon with Regal Blue:
2. Mix 50:50 of Regal Blue and Enchanted Blue to paint some lines going from the middle of the blade towards the edge of the blade on both sides (roughly 1 mm in width), then paint a very narrow line on the middle of the weapon (use just a tip of the brush):
3. Use Enchanted Blue and make thinner lines on Regal Blue/Enchanted Blue Mix lines on the power weapon and then paint thin stripped lines on the middle of the weapon:
the red line shows how I painted the lines:
4. Mix 50:50 Enchanted Blue and Ice Blue to paint even thinner lines:
again, the red lines represent the painted lines (notice that these lines are shorter than in step 3):
5. Use Ice Blue to paint even thinner lines as in step 3 but with even thinner and shorter lines:
6. Then mix 50:50 Ice Blue and Skull White to paint even thinner lines:
7. And finally add small dots of Skull White on the line intersection on the middle of the power weapon for a more realistic effect:
...the red dot represent the paint:
Now, this is completely optional but its worth the effort to get an even more realistic effect.And there you have it, a simple but effective way to represent power weapons:
If you don't like blue you can use these colours for a similar effect:
Dark Angels Green instead of Regal Blue
Snot Green insteadn of Enchanted Blue
Goblin Green instead of Ice Blue
Camo green instead of Skull White
Scab Red instead of Regal Blue
Blood red instead of Enchanted Blue
Blazing Orange instead of Ice Blue
Golden Yellow instead of Skull White


Hi I stumbled across this and used the technique to do my chaos knights' ensorcelled weapons. Thanks!
ReplyDelete