December 31, 2010
Scratchbuilding tutorial: Space Marine Predator
Greetings!
In this tutorial I'll show you how to make a Predator.
Things you'll need:
Ruler
Scalpel
PVA/Drvofix glue
Toothpicks
Hobby drill with 1mm drills
300g paper
1 mm cardboard paper
OK, let's start....
1. Print Rhino and Predator blueprints, glue them on 300g/cardboard paper respectively and cut out all pieces:
when cutting out a Rhino template, DO NOT cut out the side doors and upper hatch:
2. Start building a Rhino. You can find the tutorial here:
3. When the Rhino hull is finished, start building the turret:
4. Combine the hatch for turret, and glue it on the Rhino hull:
5. Use 300g paper to make a tube for the turret:
6. Time to start with sponsons....
After drilling holes, use tips of toothpicks or narrow wire and squeeze through the holes.
7. Next, building an autocannon....
Use a thoothpick an regular paper (cca 7 cm in wdth and 210 cm in length) an roll the paper ower the toohpick to create a tube:
Cut two ribbons, one 1cm width/210cm length, other 2cm width/210cm length and roll each on one end of tupe and glue them:
Position the tube on the turret and draw out the circle on the turret; cut out the circle and put in the tube and glue it:
And there you have it, my version of the Predator:
You can get the Rhino template here and the Predator upgrade templates here.
December 29, 2010
Painting tutorial: making simple power weapon effects
Greetings!
In this tutorial, I'll show you how to make relatively simple power weapon effects.
Paints you'll need:
GW Regal Blue
GW Enchanted Blue
GW Ice Blue
GW Skull White (optional)
so let's begin.......
1. Pain the whole weapon with Regal Blue:
2. Mix 50:50 of Regal Blue and Enchanted Blue to paint some lines going from the middle of the blade towards the edge of the blade on both sides (roughly 1 mm in width), then paint a very narrow line on the middle of the weapon (use just a tip of the brush):
3. Use Enchanted Blue and make thinner lines on Regal Blue/Enchanted Blue Mix lines on the power weapon and then paint thin stripped lines on the middle of the weapon:
the red line shows how I painted the lines:
4. Mix 50:50 Enchanted Blue and Ice Blue to paint even thinner lines:
again, the red lines represent the painted lines (notice that these lines are shorter than in step 3):
5. Use Ice Blue to paint even thinner lines as in step 3 but with even thinner and shorter lines:
6. Then mix 50:50 Ice Blue and Skull White to paint even thinner lines:
7. And finally add small dots of Skull White on the line intersection on the middle of the power weapon for a more realistic effect:
...the red dot represent the paint:
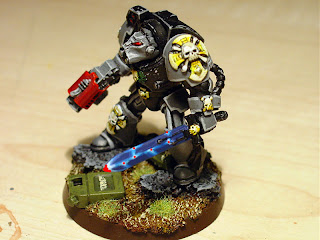
Now, this is completely optional but its worth the effort to get an even more realistic effect.And there you have it, a simple but effective way to represent power weapons:
If you don't like blue you can use these colours for a similar effect:
Dark Angels Green instead of Regal Blue
Snot Green insteadn of Enchanted Blue
Goblin Green instead of Ice Blue
Camo green instead of Skull White
Scab Red instead of Regal Blue
Blood red instead of Enchanted Blue
Blazing Orange instead of Ice Blue
Golden Yellow instead of Skull White
December 25, 2010
Base tutorial: making bases with cork
Greetings!
In this tutorial, I'll show you how to make effective bases with cork.
Materials you'll need:
Cork board (you can get it in Bauhaus)
GW sand
GW static grass
PVA glue/Drvofix glue
Superglue (preferaby Loctite Super Bond liquid glue)
GW Chaos Black paint
GW Dark Flesh paint
GW Snakebite Leather paint
GW Bleached Bone paint
GW Scorched Brown paint
GW Codex Grey
GW Fortress Grey
Toothpicks
Large brushes
All right, let's begin............
1.First off, the materials:
2. Start by taking out a couple of chunks of cork from the board:
3. Assemble the chunks of cork on the base, glue them with superglue:
4. Start applying PVA glue on the base and spread the glue with a toothpick:
5. Dunk the base in sand:
6. Start gluing bitz on the base with superglue (but this is entirely optional!):
7. Paint (or spray) the whole base with black:
8. Start painting sand with Dark Flesh, then highly dryhrush with Snakebite Leather, then lightly drybrush with Bleached Bone....and voila, the sand is done:
9. Drybrush cork with Codex Grey, and paint the bitz:
10. Add small chunks of PVA glue on the base with a toothpick and then put on Static Grass:
11. Paint the edge of the base with Scorched Brown:
12. Drybrush the edges of cork with Fortress Grey to further represent the effect of rock:
13. And thats that, here are 4 more examples:
14. ......and with models glued in place:
Subscribe to:
Posts (Atom)


